· Jimmy Ly · AI · 10 min read
Training a LoRA to Generate Custom Figurine Designs

My wife Amanda runs nua shophouse, where she creates custom clay figurines and keychains. She has a character builder on her site that lets customers design figurines from pre-built options, but many customers want fully bespoke designs. They will send a reference photo, and Amanda hand-designs a figurine on Figma in her signature style.
The design process works, but it’s slow. I wanted to see if AI could generate the initial design while matching her exact art style. The answer is yes, using LoRA fine-tuning on Flux Dev.
Closed-source models like GPT-4o image generation and Google’s Nano Banana can generate impressive images from text and reference photos, but you can’t permanently teach them a specific art style. They rely on in-context learning, showing examples each time, which produces inconsistent results. With an open-weight model like Flux Dev, you can train a LoRA that bakes the style in permanently, so every generation is on-brand without re-explaining the style.
This post covers the full process: evaluating the options, automated data preparation, training, and generating figurines from text prompts.
Evaluating the Options
Before committing to a specific stack, we evaluated the main options at each layer of the pipeline.
Base Model
| Model | Quality | LoRA Support | Training Cost |
|---|---|---|---|
| Flux Dev | Best | Growing fast | ~2× SDXL |
| SDXL | Very good | Mature ecosystem | Cheapest |
| SD 3.5 | Good | Small community | Similar to SDXL |
Fine-Tuning Method
| Method | Training Images | Training Time | Quality | Flexibility |
|---|---|---|---|---|
| LoRA | 20-50 | 1-2 hrs | High | Can combine with other LoRAs |
| DreamBooth | 5-15 | 2-4 hrs | Very high | Heavier, harder to combine |
| Textual Inversion | 5-10 | 30 min | Lower | Lightweight but limited |
| Full fine-tune | 200+ | 8+ hrs, expensive GPU | Highest | Overkill for most use cases |
Training Platform
| Platform | Cost | Ease |
|---|---|---|
| Replicate | ~£0.10/train | Upload ZIP, click train |
| Google Colab (T4) | Free | ~3-4 hours, may disconnect mid-training |
| RunPod | ~£0.50-1/hr | Need to set up notebook manually |
| Local (MacBook M4 Max) | Free (hardware cost aside) | 64 GB unified memory handles Flux LoRA; ~2-3 hrs via mps backend, slower than NVIDIA but no disconnects or cloud dependency |
UI / Workflow Platform
| Platform | Best For | Cost Per Image | Notes |
|---|---|---|---|
| Gradio + Replicate API | Prototyping with simple UI with cloud inference | ~£0.02 | Upload photo, click generate, get a shareable URL |
| Gradio + local inference (M4 Max) | Same UI, fully offline | Free | Slower (~30-60s per image), no cloud dependency |
| ComfyUI (local) | Pipeline iteration, adding ControlNet, A/B testing | Free | Engineering tool, not for end users |
What We Chose
For this project: Flux Dev (base model) + LoRA (style fine-tuning) + Replicate (training and inference) + Gradio + Replicate API (quick prototyping UI).
The Approach
The pipeline has two components:
- Base model (Flux Dev) - the foundation model that already knows how to generate images.
- LoRA (Low-Rank Adaptation) - a small adapter trained on the designer’s existing work that teaches the base model their specific figurine style.
Text prompt (character description, pose, scene, accessories)
                          ↓
                   Flux Dev + LoRA ──→ Figurine in the designer's style
The text prompt controls what to draw. The LoRA controls how it draws.
Phase 1: Data Preparation
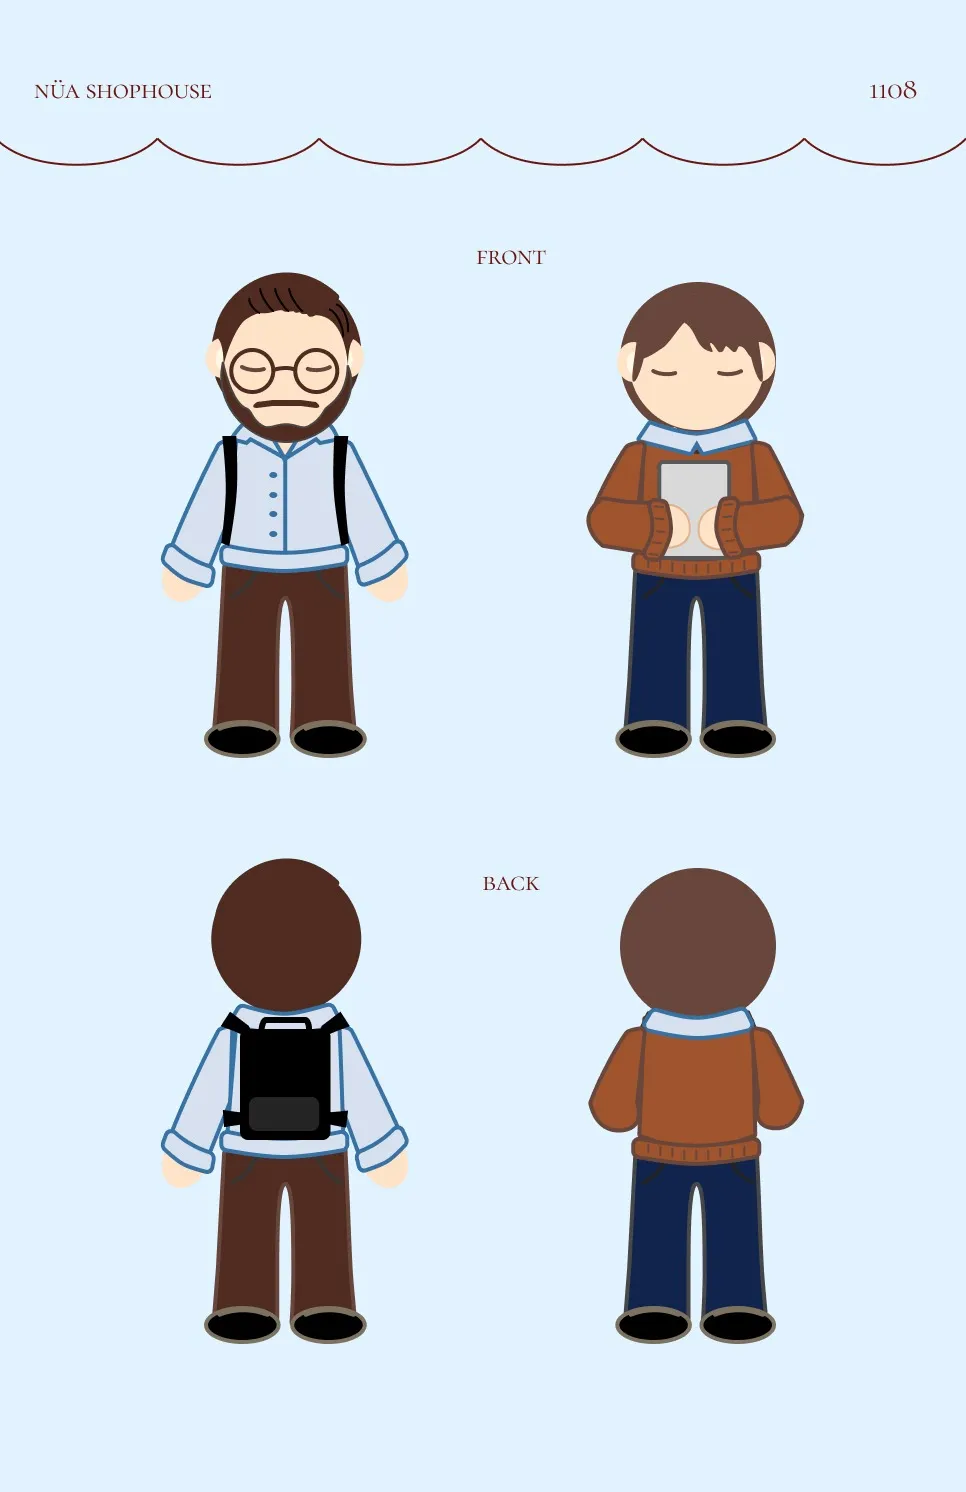
We started with 12 source images of figurine designs. The raw images weren’t usable for training as-is. They had header banners with branding text, bottom notes with design specs, layout labels (“FRONT”, “BACK”) overlaid on the figurines, and multi-figurine grid layouts that needed splitting into individual images.
Here’s a source image alongside the cleaned output. The header, labels, and grid were removed, and the grid was split into individual figurines.


We wrote a Python cleanup script using OpenCV, EasyOCR, and NumPy that crops headers/footers, splits grid layouts, removes overlaid text labels via inpainting, and resizes everything to 1024x1024.
A second script renamed the files sequentially (figurine_01.png, figurine_02.png, …) and generated caption .txt files for each image. Each caption includes a trigger word and a description:
a nua_figurine_style chibi figurine of a man with glasses and beard
wearing a backpack and casual outfit, stylized proportions, pastel
earth tones, flat illustration style, circular grass base
The trigger word nua_figurine_style is what activates the trained style at inference time.
Final dataset: 12 cleaned 1024x1024 PNG images with matching caption files.
Phase 2: Model and Platform Selection
We went with Flux Dev over SDXL. For figurine/illustration work specifically, Flux handles chibi proportions and flat colour styles better than SDXL. The LoRA training ecosystem has matured enough that the quality difference justifies the cost.
For the platform, we chose Replicate for its fast iteration, built-in API for later automation, and no risk of losing a 4-hour training run to a Colab disconnect. The T4 GPU on Colab’s free tier has 15 GB VRAM, which is enough for SDXL LoRA but not Flux Dev (needs ~24 GB). A MacBook M4 Max with 64 GB unified memory can handle Flux Dev LoRA training locally via PyTorch’s mps backend, but training is ~3-5× slower than an A100. Still viable if you prefer zero cloud cost and full offline control.
How Flux Dev Works
Flux Dev is a latent diffusion model built by Black Forest Labs. Instead of generating pixels directly, it works in a compressed latent space. An image is encoded into a small latent representation, noise is added, and the model learns to reverse that process. At generation time, it starts from pure noise and iteratively denoises it into a coherent image, guided by the text prompt.
Flux Dev uses a flow-matching architecture rather than the older DDPM noise scheduling used in Stable Diffusion. Flow matching defines a straight-line path between noise and data, which makes training more stable and inference faster. It also uses a dual text encoder (CLIP and T5-XXL) to understand prompts, giving it stronger text comprehension than single-encoder models like SDXL.
How LoRA Fine-Tuning Works
LoRA (Low-Rank Adaptation) works by freezing the base model’s weights and injecting small trainable matrices into specific layers. Instead of updating all 12 billion parameters in Flux Dev, LoRA decomposes the weight updates into two small matrices (rank 16 in our case), which drastically reduces the number of trainable parameters to around 20 million.
During training, the model sees each training image, predicts the noise that was added to it, and adjusts only the LoRA matrices to minimise the prediction error. The trigger word (nua_figurine_style) in the captions creates an association between that token and the visual style, so at inference time, including the trigger word activates the learned style.
The result is a .safetensors file containing those ~20 million floating-point numbers organised into tensors. The base Flux Dev model has billions of weights; the LoRA is a small set of adjustments to a subset of those weights.
Flux Dev:  [0.0042, -0.0183, 0.0271, ...]  ← billions of weights, ~12 GB
LoRA:      [+0.0003, -0.0001, +0.0005, ...]  ← ~20M adjustments, ~50-150 MB
Combined:  [0.0045, -0.0184, 0.0276, ...]  ← figurine style
At inference time, both get loaded together. The LoRA “patches” the base model’s behaviour without replacing it.
Phase 3: Training
We used the ostris/flux-dev-lora-trainer on Replicate with these settings:
| Parameter | Value | Why |
|---|---|---|
| steps | 1500 | Sweet spot for 12 images. Each image seen ~125 times. |
| lora_rank | 16 | Higher ranks (32, 64) double training time with marginal gain for small datasets |
| learning_rate | 0.0004 | Flux default |
| resolution | 1024 | Matches training data |
| batch_size | 1 | Larger batches need more VRAM |
| autocaption | false | We wrote our own captions |
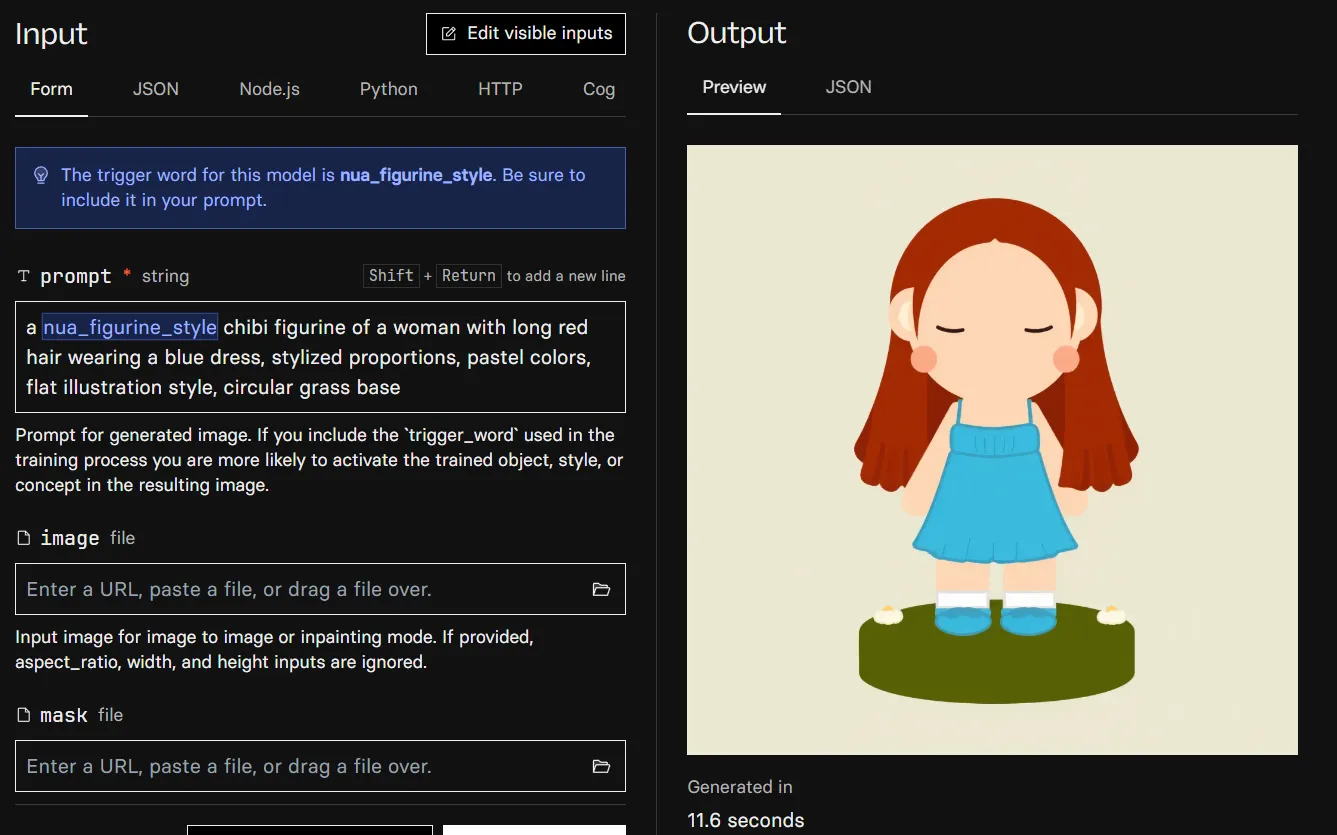
Training completed in ~25 minutes at a cost of less than £0.10. Here’s the trained model generating a figurine from a text prompt, taking 11.6 seconds per image.
Steps and Overfitting
Each training step = the model looks at one training image, compares its output to the real image, and adjusts weights slightly. With 1500 steps and 12 images, each image is seen ~125 times.
- Too few steps (500): model barely learns the style, outputs look generic
- Sweet spot (1000-1500): learns the style while staying flexible for new characters
- Too many steps (3000+): overfitting. The model memorises the training images instead of learning the style, and outputs look like copies rather than new designs.
Phase 4: Generating Figurines
With the trained LoRA, generating a figurine is as simple as writing a text prompt that includes the trigger word:
a nua_figurine_style chibi figurine of a woman with glasses and curly hair
wearing a superhero cape, pastel colors, stylized proportions,
flat illustration style, circular grass base
The prompt follows the same pattern as the training captions. This consistency is what makes the LoRA activate reliably. Describe the character, their outfit, any accessories or scene elements, and include the style descriptors (stylized proportions, pastel colors, flat illustration style, circular grass base).
What About Reference Images?
A natural next step would be uploading a customer’s photo and having the AI generate a figurine that looks like them. In practice, this is harder than it sounds.
Replicate’s Flux runner supports img2img, where you upload an image and set a prompt_strength to control how much the output deviates from the original. But img2img is a blunt tool: at low prompt strength, the output looks like a filtered photo (the LoRA style doesn’t activate). At high prompt strength, it ignores the reference entirely and generates from text alone. There’s no setting where it reliably keeps the person’s likeness and applies the figurine style.
The proper solution is image conditioning. Techniques like IP-Adapter or PuLID extract visual features (face shape, hair, skin tone) from a photo and inject them as separate conditioning signals alongside the text prompt. These don’t replace the generation process; they add identity information to it. But for Flux Dev specifically, these tools don’t yet integrate cleanly with custom LoRAs on Replicate.
Some potential approaches for adding reference image support in the future:
- PuLID for Flux is available on Replicate (
bytedance/flux-pulid) and is good at preserving facial identity, but doesn’t support loading custom LoRAs in the same pipeline. - Flux 2 Dev has built-in multi-reference support (up to 10 images) without needing IP-Adapter, though LoRA support is still maturing.
- ComfyUI locally is a node-based workflow tool where you can wire Flux Dev + LoRA + PuLID together in a single generation pass, giving full control over each component’s strength.
- Two-step pipeline where you generate a figurine from text with the LoRA, then use a separate model to apply the customer’s likeness.
For now, the simplest and most reliable approach is text-only prompting. Describe the customer’s appearance in the prompt. For chibi figurines where faces are simplified anyway, a good text description (woman with glasses and curly brown hair) captures enough to produce a recognisable design.
Phase 5: Building a Gradio UI
Running prompts through the Replicate playground works, but it’s not something you’d hand to a non-technical user. We built a simple Gradio app that wraps the Replicate API into a clean interface. Type a description, click Generate, and get figurines back.
The core of the app is a single function that prepends the trigger word to the user’s prompt and calls replicate.run():
import replicate

MODEL_NAME = "XXX"
TRIGGER_WORD = "nua_figurine_style"

def generate(prompt, lora_strength, num_outputs, aspect_ratio, output_format, steps, guidance_scale, seed):
    full_prompt = f"a {TRIGGER_WORD} {prompt}"

    output = replicate.run(MODEL_NAME, input={
        "prompt": full_prompt,
        "num_inference_steps": steps,
        "guidance_scale": guidance_scale,
        "lora_scale": lora_strength,
        "num_outputs": num_outputs,
        "output_format": output_format,
        "aspect_ratio": aspect_ratio,
    })

    return output
The Gradio UI exposes the prompt field and a Generate button, with advanced settings (LoRA strength, guidance scale, steps, aspect ratio) tucked behind an accordion so they don’t overwhelm non-technical users. The defaults match Replicate’s (28 steps, guidance 3.0, LoRA scale 1.0) so you can generate without touching any settings.
Here’s the Gradio app generating a figurine from a text description.

What We Learned
Data quality matters more than quantity. 12 well-cleaned, consistently-styled images with accurate captions produced better results than throwing 30 messy images at the trainer.
Flux Dev over SDXL for illustration work. The quality difference is noticeable for chibi/flat illustration styles. The extra cost (~2x) is justified if the output quality matters.
Cloud training is the pragmatic choice for fast prototyping. Training cost less than £0.10 with image generation costing around £0.02 on Replicate beats buying an RTX 4090 or fighting free Colab constraints. The built-in API also makes automation trivial later.
Captions are underrated. The trigger word (nua_figurine_style) and descriptive captions are how the model learns to separate “your style” from “what’s in the image.” Generic or missing captions lead to a LoRA that’s harder to control.